Scrappy Chat Designs August Kit Inspiration

Hi all. Just popping in quickly to share with you one of my creations using the August Scrappy Chat Designs kit "Sea Breeze".


I was really apprehensive about combining the purple with these papers but once I sat down and started moving the pieces around on the background paper I had chosen, I could see a master plan emerging!

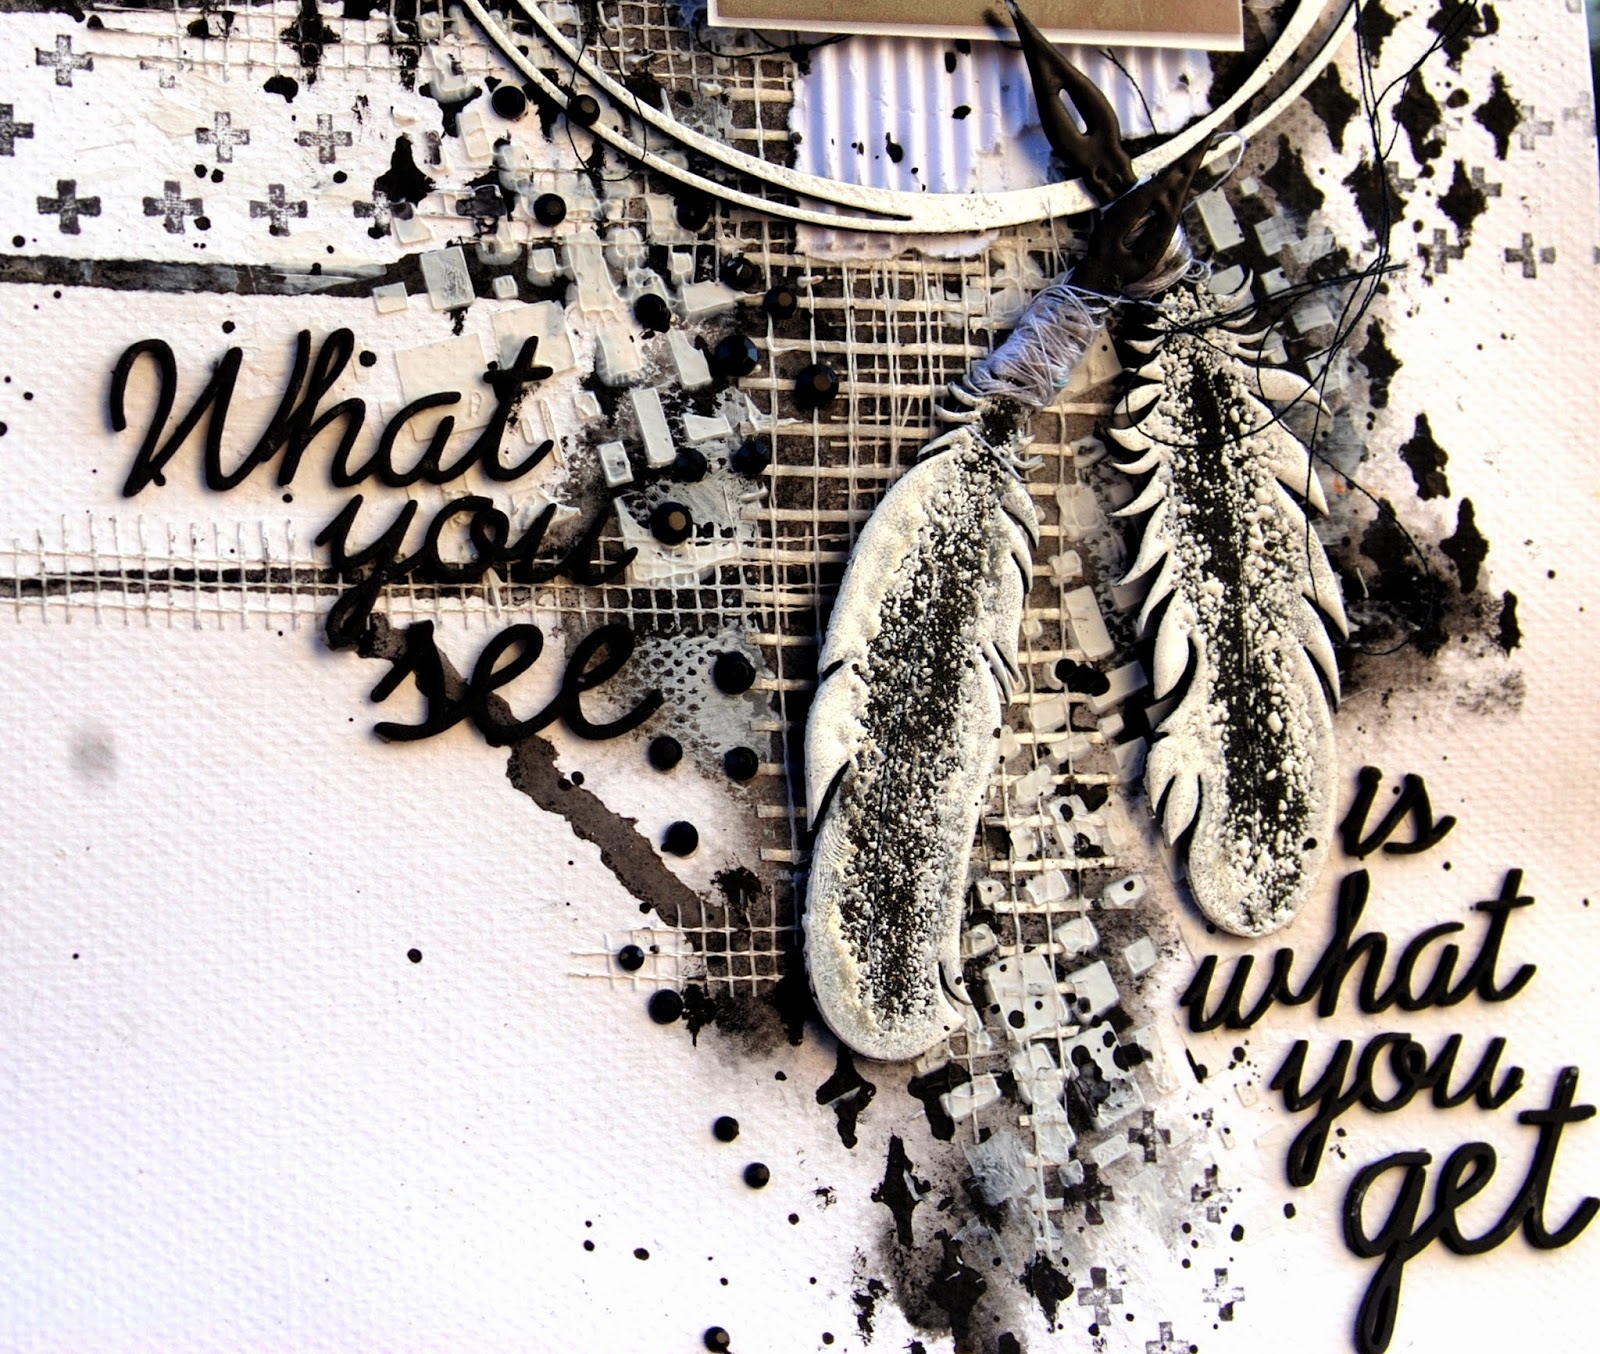
This kit features some cool less consumable product with a fun twist.  Aside from the divine Prima Marketing papers in the kit, there is plenty of Cardstock, Scrapmatts chipboard pieces in white, custom colour Tinby Designs Metallic melts in Ocean Jewel (you can only get that colour by purchasing this kit) Tim Holts Distress re-inker and on trend gold trim, metal butterfly embellishment, kaisercraft texture stamp and My Mind's Eye Enamel dots. As you can see as always this kit is jam packed with product for you to learn and get creative with.


Here is some more information for those wanting a to know little more information about our kits.

They are self-paced class kits to complete in the comfort of your own home or with a group of friends

Each month there will be LOADS of added inspiration with one of the designers creating 3 layouts of their own style with the kit, and to not leave it there the other two ladies will be sharing some added techniques using the product in the kit, so you can learn more and more!
Each premier kit comes with:
  • Video AND  instructions to complete the three layouts
  • Feature a many techniques with product to be used well after the life of the kit.  (With all of our kits you will have plenty of product and knowledge to add to future projects)
  • Photos of each project including close up detail pictures
  • All the product needed to complete the project with a list of additional basic items used such as ink/ paints/gesso/texture paste and colour sprays you will need out of your supplies.
The kits focus on how to use various products teamed up with some pretty paper to compliment them, so there is always less or non-consumable products in our kits, to not only help you complete some beautiful projects, learn many techniques and ways of using the different product as well as taking them well beyond the kit projects.

Kits are $39 + postage and come out monthly


To order visit our website www.scrappychatdesigns.com.au 

Scrappy Chat Designs Kit club Membership (e-mail us to purchase):

This lasts for 3 months is $135 and includes 3 kits at 5% off and postage for all 3 kits (they are released monthly).  As a member you also get ‘insider’ info on what is coming up in the next kit – sometimes even a pic!  You are also guaranteed the kits which do sometimes sell out VERY quickly.  If you are interested in membership, you need to pay the membership fee by the 30th of the month prior.  So to commence in September (next kit to be released) you need to have your membership fee paid by 30th August - Just email for this deal orders.scrappychatdesigns@gmail.com 

Rainbow Art Journal Page and Process Video

Hi everyone. I'm back again with another little process video showing how I created this "Rainbow" art journal page using some amazing Tinby Designs "Metallic Melts" and watercolour paints.


I have to thank Romain Bourdin for his inspirational video of his Rainbow art journal page. It was so beautiful and got me thinking about how I could incorporate the "Metallic Melts" into a similar creation.


As you'll see in the video, I stamped using versa pigment ink a rainbow of colours. Each time, covering the ink with a corresponding "Metallic Melt" and heat setting it. The stamps I used were from the Terrace Garden collection called Moroccan Tiles. The set can be found on page three of their online catalogue.


The quote I chose to use says "Without the rain there wouldn't be a rainbow". I love it and it is so true. Sometimes we need to see past the bad times and look for the good things. There are always good things. It's just a matter of looking for them.


I hope you enjoy this little tutorial. I really love making them. it's a great way for me to keep a catalogue of my work and to go back through to remind me of techniques I may have forgotten about.

Thanks for stopping by.

See ya next time.

Cheers
Fiona xx

Birds on a Wire Art Journal Page

Hello all. I've been busy with some Art Journalling recently. I love to explore different techniques and practice old ones in my journal. For this page I also made a quick process video that I wanted to share with you today.


As you'll see in the video, I started by giving my pages a coat of white Gesso and then added some scraps of patterned paper and colour by using "London Blue" Dylusions Ink Spray and watercolour paint.


The feature of the journal page, are these gorgeous little "Birds on a Wire". I've cut them onto some textured black paper using a die from Die-Namites.


I'm really happy with how this turned out and the different shades of blue look fabulous.


I hope you enjoy the process video. I'll be posting some more very soon.

Thank you for stopping by.

Cheers
Fiona xx


Scrappy Chat Designs August Kit Inspiration


Hello peeps. Today I'm here to share with you a sneak peek of my Layout for the August Sea Breeze kit.


What a beautiful kit this one is. The Prima Seashore papers combined with the Milled Lavender Distress Ink refill are a genius combination. I created a soft background for this page using the Kaisercraft Honeycomb stamp, Tinby Designs "Patina" Metallic Melts and the Distress Ink refill as a water colour wash all of which come in the August kit plus more!


For a full technique sheet including photos and detailed step by step instructions on how I created this affect, pop on over to the Scrappy Chat Designs blog for more details.

Thanks for popping in and checking out my creation.

Cheers


2Crafty Chipboard post for August

Hello Everyone.
Time to share my layouts for 2Crafty Chipboard for August. My first layout is my entry for the White With One challenge this month "Liquorice". What an awesome colour choice.

For this project I used:

"Soft Feather Set"
"Pen Nibs" 
"What You See"
"Circle Revolution Frames"

"What You See Is What You Get"


The title Chippy "What you see is what you get" says it all! This is me. No makeup, no photoshop, no hair curled, just me after a day of work. I simply painted the title black to contrast with the white background. It comes in one piece so I just trimmed it up so I could place it where I needed on my layout.


I've wanted to incorporate the "Soft Feather Set" into one of my layouts for some time now. I love them especially embossed. I've painted them with black acrylic paint and then sprinkled some white embossing powder over the edges to create a feathered affect. It really makes them pop. I added "Pen Nibs", attached with white cotton, to turn them into quills.


Then I framed my photo with one of the circles from the "Circle Revolution Frames". I always find a million uses for these circles! I simply covered it in with Watermark clear embossing Ink and coated it with white embossing powder. The glossy result is divine.


My next project is a little different from what I normally attempt. It's very masculine.
For this project I used:

"Birds on a Wire"
"Giant Gears" 
"ATC Friend Card Words"

"Friends Forever"

This is my awesome hubby chatting over a bottle of Red with my sisters husband. These two get on like a house on fire. It's a pitty we live so far away from them. We miss them dearly xx.
I really enjoyed creating this layout and experimenting with grunging up the chipboard pieces. I started with the "Birds on a Wire". I painted them black and then added some bronze Metallic Melts embossing powder. Once that dried I went over the top of the birds slightly with a bronze ink pad.


The "Giant Gears" on the right hand side were both treated differently. One I inked with bronze and then smeared black Gel medium over it. The same medium I used in the background. The other "Giant Gear" I painted black and sprinkled Bronze Metallic Melts embossing powder around the edge. I love how they appear metallic and rusted.


The "Giant Gear" on the left hand side I covered with gold drawing Ink and then again sprinkled Metallic Melts in the Copper over sections of it. I also smeared some black gel medium on this one too.


The title from the "ATC Friend Card Words" I also covered in gold drawing ink, smeared some bronze ink over the edges and then embossed with Metallic Melts Copper embossing powder.

My next project is completely the opposite. It is bright and light and very feminine. 
For this project I used:

"Family Symbols"
"Polaroid Frames" 
"ATC Hearts and Stars"

"Life is a Journey"


I love the "Polaroid Frames" when used to frame photos on a layout. They are a perfect size and nice and thick which means you can cover them with whatever takes your fancy and for me, this time around, it was more Metallic Melts. This time I tried blending three colours around the frame by adding a little bit at a time, covering the edge of the last colour ever so slightly. I repeated this many times. I love the end result and because the chipboard is so strong, you can re-heat the Metallic Melts over and over again without damaging your chippy!


The "ATC Hearts and Stars" are one of my favourite little chippies from 2Crafty Chipboard. I've pretty much used them all up now so I'll have to get some more. I add them here and there to most of my projects but this time I wanted to make a feature of them. I covered them in different pastel Ink colours and added a coordinating Metallic Melts embossing powder. It was fiddly and time consuming and I did get a little frustrated as I chased the little loves all around my craft sheet trying to heat them and then.......... a friend suggested I attach them to some double sided tape to hold them in place while I heat them!!!! Aaaaggghhhh ....Next time ....


To tie it all together I added a little girl from the "Family Symbols". She's covered in an old book page (my favourite paper to use on my layouts). She coordinates with the book page papers I used on the background.


So that's me again for another month. I hope you've enjoyed reading my post and checking out my creations. Thank you for popping by and I'll catch you all again next month.

  And remember, to find a 2Crafty stockist near you, drop an email to...
salesat2crafty@optusnet.com.au

White With One Challenge for August

I've been so busy this month that I haven't had a chance to enter any challenges. But White With One have done it again! They have captured my imagination hook, line and sinker. When I saw their colour for August was "Liquorice" I had to have a go and so I managed my DT schedules so I clould fit this layout in amongst them. I incorporated it in with my 2Crafty Chipboard DT work.


The background is a 12x12 piece of water colour card stock from Kaszazz. I love this card because it takes the water colours I often use on my backgrounds really well. This time I used black water colour. It was a very tense few moments as I carefully added each layer as it's such a strong colour and I wasn't sure what it would turn out like. But the results were striking!


My next layer was to add some grid tape over the water colour to create the first black and white contrast. Then I added black gesso through the "Spinning Top" stencil from TCW. I used a stipple brush to do this as I didn't want to give the gesso a chance to bleed and spread uncontrollably over the page.
The next layer was some white modelling paste through a Stencil from TCW called "Cubism". My new currently favourite stencil!


I tilted it for a different affect. The 2Crafty chipboard pieces I incorporated were "Soft Feathers", "Pen Nibs", "Circle Revolution" and the title "What you see is what you get". I connected the pen nibs to the feathers to create quills and embossed them with black and white embossing ink.


The title I simply painted black. It comes in one whole piece so I trimmed it to fit onto my layout where I wanted it to go. The circle was also embossed with white embossing powder which makes it shine beautifully. Love the glossy affect.


The last step was to add some stamping. I decided to stick with the crosses theme and using black archival ink, rolled a Glitz Designs Giant Roller Doodle stamp. To bling it up, I added some black half round gems.


Well done White With One. You've hit the jackpot with this choice. LOVE IT!

Thanks for popping by and checking out my creation.
Cheers


Escape 2 Create 2015 Teacher Reveal

WOOT WOOT!!!
Finally I am able to reveal to you all that I have been asked to teach at the up and coming 
E2C retreat in 2015.

This is such an exciting opportunity for me. Never in a million years did I ever think I would have an opportunity like this come along and yet ...... here it is.


So much excitement surrounds this event that you can't help but be caught up in it all and I am definitely EXCITED!

This is a very popular event, so popular in fact that peeps sit ready by their computers on registration day with their finger hovering over the send button on their emails. It's a first in best dressed affair with only  80 places available and only one proxy allowed for each registration. Stressful!!

I'll be joined by these other three beautiful and talented ladies.
Chantalle McDaniel
Kim Price and
Leanne Allinson

If you want a chance to be part of the fun in March next year, then pop on over to the Facebook page and take a little gander at the details. You can find it HERE.


Soon I'll be revealing a sneak peek of the class I'll be teaching. It features some awesome 2Crafty Chipboard and a mixed media flavour, with lots of stamping and some fussy cutting and of course there is cotton involved! It wouldn't be a Fiona Layout without some cotton!! I hope you like it.

Some of the details are:

LOCATION: Port Lincoln South Australia (QANTAS flies directly into Port Lincoln daily)
DATES: 20th - 23rd March 2015
COST: $280 includes accommodation, all meals, a goodie bag and a table full of prizes for raffles held throughout the weekend.

For more information you can visit the blog HERE

I really hope to see you there. It would be awesome to meet some of you in person and share creative ideas and laughs.

Cheers For now xx


Guest Designer over at Charms Creations

Hi guys. I am so excited to share with you my Guest Design spot over at Charms Creations. I have been an avid fan of Charmane's for some time now. She is originally from my home town and I first saw her incredible creations at our local market. I bought some beautiful hand made flowers from her and still use them to this very day. I've kept them as part of my "special" stash, you know those bits and pieces that are so precious that you hold on to them for a long time until just the right project turns up! Yeah we all have those!

So when Charmane contacted me and asked me to Guest Design for her I almost fell off my chair! Ummmm yeah of course I will LOL. What an honour xx. In fact it was Charmane's mum, Bronny, who got me addicted to mixed media and art journalling when I attended one of her classes. She showed us how to bind our own Art Journal and I've never looked back since.

So this is what I've created for Charmane. I used the heart and map marker in the coffee. I love this combination of colours.


I find the earthy colours so easy to work with and I love them combined with the blue. The back ground paper is from The Seashore collection from Prima and is called Sea Shell. It is in the up and coming August kit from Scrappy Chat Designs released on the 21st August.


I've combined lots of mixed media onto this layout from stencilling with modelling paste, stamping with Distress Ink, blending with a stencil and Distress Ink, Dylusion Sprays flicks and embossing with Metallic Melts from the Tinby Designs embossing powder range.


My favourites from the Charms Creations range would have to be the "Book Pages" elements. Any thing to do with book pages is AWESOME in my mind!


But I also love the little Butterfly Runners. I've used these a couple of times on my projects. they add a real sweet element to the page.

 I'm also really partial to the chevrons (any colour) and any of the hearts. As you can see they work on any page. I've been lucky enough to have won some challenges that Charms Creations sponsor and a giveaway once that Charm was running (such a generous soul xx), so now I have a nice little collection in m stash, however there is always room for more *wink wink*

Thank you for popping and and checking out my post. Catch you next time
Cheers


Scrappy Chat Designs July Kit

Just a quick little share today to show you my Scrappy Chat Designs layout for the current July kit.
The kit includes some beautiful papers from October Afternoon and the lovely complimenting colour Broken China Distress Stain.


I found the papers guided me towards an antique style of layout and so I created this. The border is created by using a distressing technique and then adding some Distress Inks. I've also incorporated some Tinby Designs Metallic Melts in the "Pink Sorbet".


For a full technique sheet including photos and detailed step by step instructions on how I created this affect, pop on over to the Scrappy Chat Designs store and email Beck to arrange your membership.

Thanks for popping by

Cheers


Little Canvas

Hello. Just a quick little post to share with you my little canvas I made for my Off the Rails Scrapbooking tutorial. I've been going through the colour wheel with members, showing them all the different ways to combine colour. This time the tutorial was all about "Monochromatic" colour schemes.


So I made this little mixed media canvas to demonstrate how to use such a colour scheme.


I used Gesso, LOTS of Gesso, some water colour Inks and Colour Spray Mists along with a small collection of paper flowers and a gathering of embellishments, the feature of them being the little Prima resin frame.


I've given this to my Aunty as she's just recently built a new home and I thought it would make a lovely house warming gift, hence the title "Home Sweet Home".


I do love the monochromatic style. I use it often, especially in my White With One challenge entries. Well Like I said, just a quick one from me this time.

I hope you enjoyed it.

Cheers

Fiona xx