Just For You a Project For 13Arts

Hello I'm here with you today to share a little frame I have created for 13Arts using some of the gorgeous Ayeeda Mists, Shiny Powders and of course some lovely flowers.
I bought the little frame from K-Mart and covered the back piece with some Posy paper from the Out of the Blue Collection.


I sprayed the Ayeeda Mists to add some extra colour and then brushed the flowers with Shiny Powders.


I added some stickers for the butterfly and the title.


Products used:


Pencil Case Makeover for Viva Las Vegastamps

Hello I'm here with you today to share a little pictorial tutorial on how I gave my pencil case a makeover using the gorgeous new stamps by the very talented  Corrie Herriman and Tera Callihan for Viva Las Vegastamps


I bought this little gem at K-Mart. It is made from canvas that has been dipped in a matt rubber covering on the bottom. It is very cool and as soon as I saw it I knew I wanted to give it a makeover!


I began by giving it a light coat of gesso and once that was dry I started to collage some old book pages, music sheets, stamps and other ephemera onto the gesso with some matt gel medium. While I waited for the first layer of gel medium to dry, I stamped out some of the girls new designs onto some old book paper and coloured them using some water soluble pastels. You could use anything you liked to give them some colour. Then I cut out and layered the stamped images on top of the layer of ephemera and gave it another coat of matt gel medium.


Next I added some white contrast with ultra white gesso. I scraped it over with a palette knife, then with my finger I added just a touch of black contrast using some black acrylic paint then finally I added my colour element. I only choose three colours to add because there was already a lot of colour going on with the stamped images.


Speaking of stamped images ..... I wanted a feature piece so I chose the Whimsical Lettered Man and stamped him in a place where there wasn't as much going on with some black Archival ink. 

Tip: Place a hard cover book inside the pencil case to press onto when you stamp. It gives you a nice firm surface to work with.


Lastly .... and this is the best bit ... I added some white paint pen marks over the top of the black areas, I scribbled randomly and with my non dominant hand all over the front with a led pencil, I then outlined roughly any areas I wanted to enhance using a black biro (ball point pen) and then finally I added a little bit more black stamping with the little star and heart and some acrylic SPLASH! Ink.

Here is a list of the Viva Las Vegastamps I used:


I think you'll agree it looks much funkier now!!

Thanks for popping in to take a look and I'll see you all again soon xx

My Time at Artified with Dina and the girls

Last Friday I had the privileged of attending one of Dina Wakley's classes while she was in Australia again this year. I had attended them last year and when I saw she was coming out again I couldn't resist catching up and having some creating time with her.


I attended the little journal making class and thoroughly enjoyed it .... as I knew I would.


Lots of stenciling, stamping and random "Just do, don't think" .... Dina's motto for the class!


The little journal has become a memory of my time in the class as I've added the little photos into it that we took after the class in the photo booth .... yes there was a photo booth!!!


I also purchased some of the Chit Chat word stickers while I was there so I could add them to my book. I've been eyeing these off for sometime now and figured it was the perfect opportunity to grab them ... before they all disappeared!! 


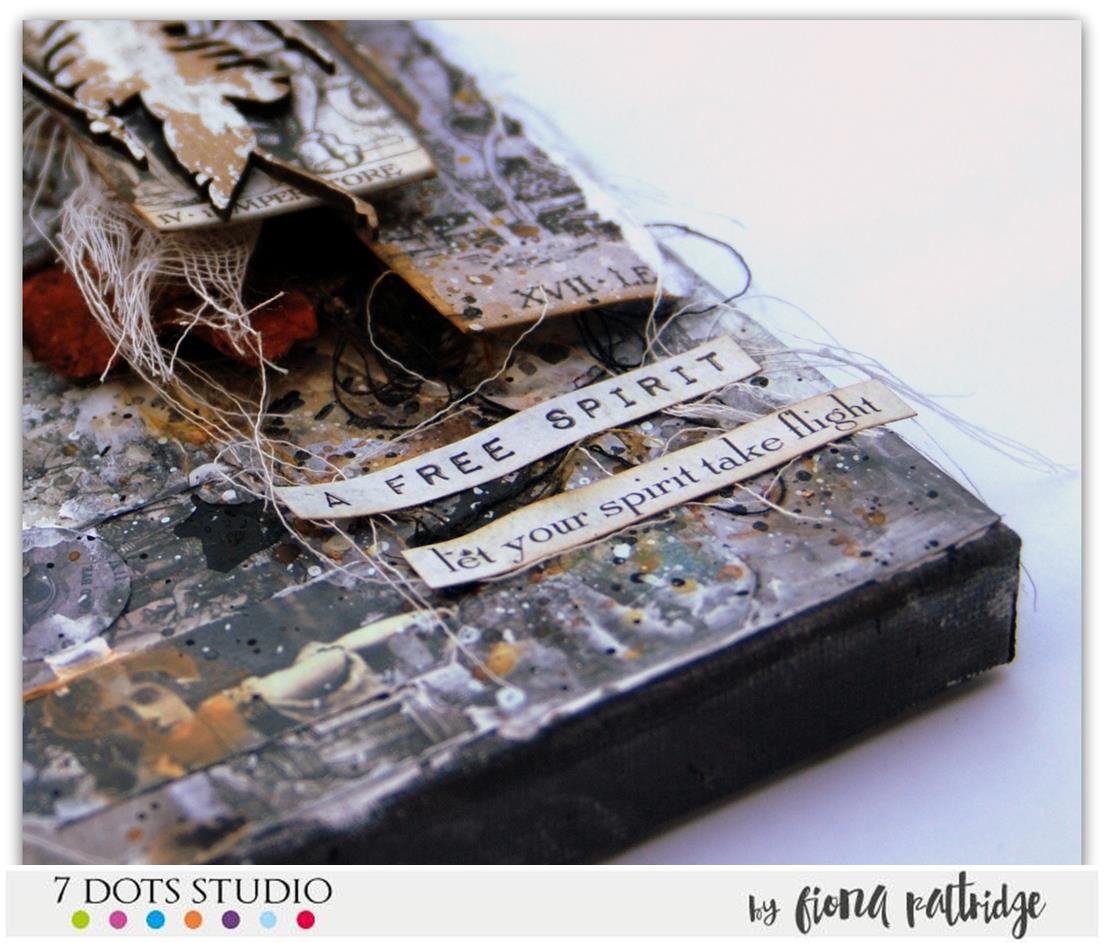
My little journal also took on a story in itself. Thanks to Dina and her thoughtfulness ....
Let me explain.


I had been attending a conference that day for work and was sure I'd make it on time if I left at afternoon tea break .... and then in true Melbourne Spring weather fashion .... it rained. No let me refphrase that .. it POURED down .... and when it pours down in Melbourne people forget how to drive!!! So here I am driving down the freeway ... at 20kms an hour!!!! So naturally I was VERY late for the class.


But Like I said, Dina is a very thoughtful lady and she had actually started my little book for me .... It was being used as her demo piece "A glorous Mess" as she called it ..... I was so thankful as I would have had to have gone FLAT OUT to make up the time, but instead all I had to do was join in with where everyone was up to already!!


And the bonus was ... as I mentioned to Dina .... that she had done the hardest part for me ... she had chosen the colour combo I would be using (I always procrastinate about this step). It was gorgeous, of course, yellow, Fuchsia and some Cheddar ...... and a hint of turquoise ...


It was so mush fun catching up with old friends and meeting new ones. I love the social side of attending classes almost as much as I love learning new techniques and having some time to create freely.


And so more about the photo booth!!
You can see here Kylie and I are on our best behaviour because we are in the booth with Dina .....


I should have known better .... I knew from past experiences that Dina likes a laugh ... or twenty, so when she suggested we silly it up for the next photo we joined in the fun ....


I got a bit sillier and Dina, well she was hilarious as per Dina would be .... Kylie, still a bit sedate (nice glasses btw) but then ...... on the third photo ....


Quote of the day from Dina "Here, hold my leg!" Oh boy ..... we laughed and laughed and laughed and then laughed again when the photo was printed!!!


I was blessed enough to have some "us time" too while at dinner and I did manage one really nice photo  .....


But in all honesty ..... I love the sillier ones better ... it just wouldn't be Dina time if there wasn't the odd silly photo or two!

Thank you so much Mel at Artified for bringing Dina out again. You are such a fabulous supporter of artists both locally and Internationally.

Thank you Dina for being you and being so inspiring ... until next time xx

A Little Canvas for 7 Dots Studio

Hello! I'm  here with you today to share a little canvas I have made using the 7 Dots Studio "Fortune-teller" collection.


I collaged some of the paper scraps I have and some of the die cut elements onto the background with a gel medium and then gave it a light brush over with white gesso and some black carbon water soluable pencil.


I love the shadow effect it gives with each piece of the collage. Next I layered up some goodies to created a focal piece. I simply used more scraps and a couple of tags from the 12x12 piece. I grunged them up a bit with some ink and gesso and added them with a strong glue and cardboard in between to lift each layer.


The finishing touch was to add some distressed cheese cloth, some splashes of colour and a gorgeous "Dream Catcher" chipboard piece from the Um Wow Studio range that compliments the Fortune-teller collection.


I hope you have enjoyed my little canvas piece. I will see you all again very soon.


Guest Designer Over at More Than Words for October

I am beyond thrilled to have been asked to be a guest designer over at More Than Words this month. The inspirational word they have chosen for the month is "Change" and the creative element is "Ombre". This is what I created.


And here is the inspirational panel from More than Words.
My creation today is based around my handmade ombre background. I have a link to the tutorial so you can learn how it came together and maybe give it a go yourself.

 I styled my layout on one of my favourite designs that I fondly refer to as "The Elephant". With the ombre I felt that it suited it perfectly, the way it cascades down the page just like the colours do. 

Here is the video tutorial on how I created the Ombre background.


I believe change can be a funny thing. On the one hand we need to change to be able to move forward in the world but on the other hand there are some things I really don't like having to change. In general I'm ok with change. I work in an ever changing environment and like to keep up with current trends so change is inevitable and I manage it well but when it comes to some changes in my personal life, I find myself struggling. The changes that have occurred so quickly right in front of my eyes. 


My children growing into young adults. They have grown up way too fast and although this change in life, from child to adult, I know is so important for them, it is really hard for me to let them be "grown ups". I am still practising how to let them go. 


I have got better but every now and then they remind me "Mum ...... it's ok I've got this".  So I titled my page "Never Change A Thing" but journaled around the design with words that encouraged their growth such as "change is always a good thing" and "Change makes us stronger". A very conflicting page but I think it has been good therapy for me to remember that it's ok "They've got this"

You can find the challenge details HERE

Until next time xxx

Product list:

13@rts
Water color Ink -  BlackAmber Yellow and Pink
Stencil - Swirls
SPLASH! Inks - PinkWhiteGlitter Pink
Ayeeda Mists - Chalk FuchsiaPastel BerryPastel Pink

Um Wow Studio Chipboard
Potty People
Potty People Mash

Viva Las Vegastamps
Invoice Background