I'm a Creep - A little tag for VLVS


For my last share over at Viva las vegastamps I tried to make something slightly creepy to go with the months theme but I think it's still kind of cute .... But I did include numbers, grey and browns and a sunburst!


I hope you will be able to join us in this challenge.

Viva Las Vegastamps used include:


13Arts Share for May

Hello all! I'm shgaring today a little tag I have made for 13@rts using some papers from the gorgeous Out of the Blue collection, the new Rainbow Colors and some SPLASH Inks to finish it off.


13@rts Products Used Include;


Thank you for popping in and checking out my little tag.

See you all soon.

My May 2 Crafty Chipboard Shares

Hello I'm here with you today to share a couple of things I've been working on recently for 2Crafty Chipboard.

"I Love You"


2Crafty Chipboard used:
"Alpha Set 1"
"Soft Feathers"
"Card Sentiments"
"Fencing Wire"
"Tiny Film Strips"

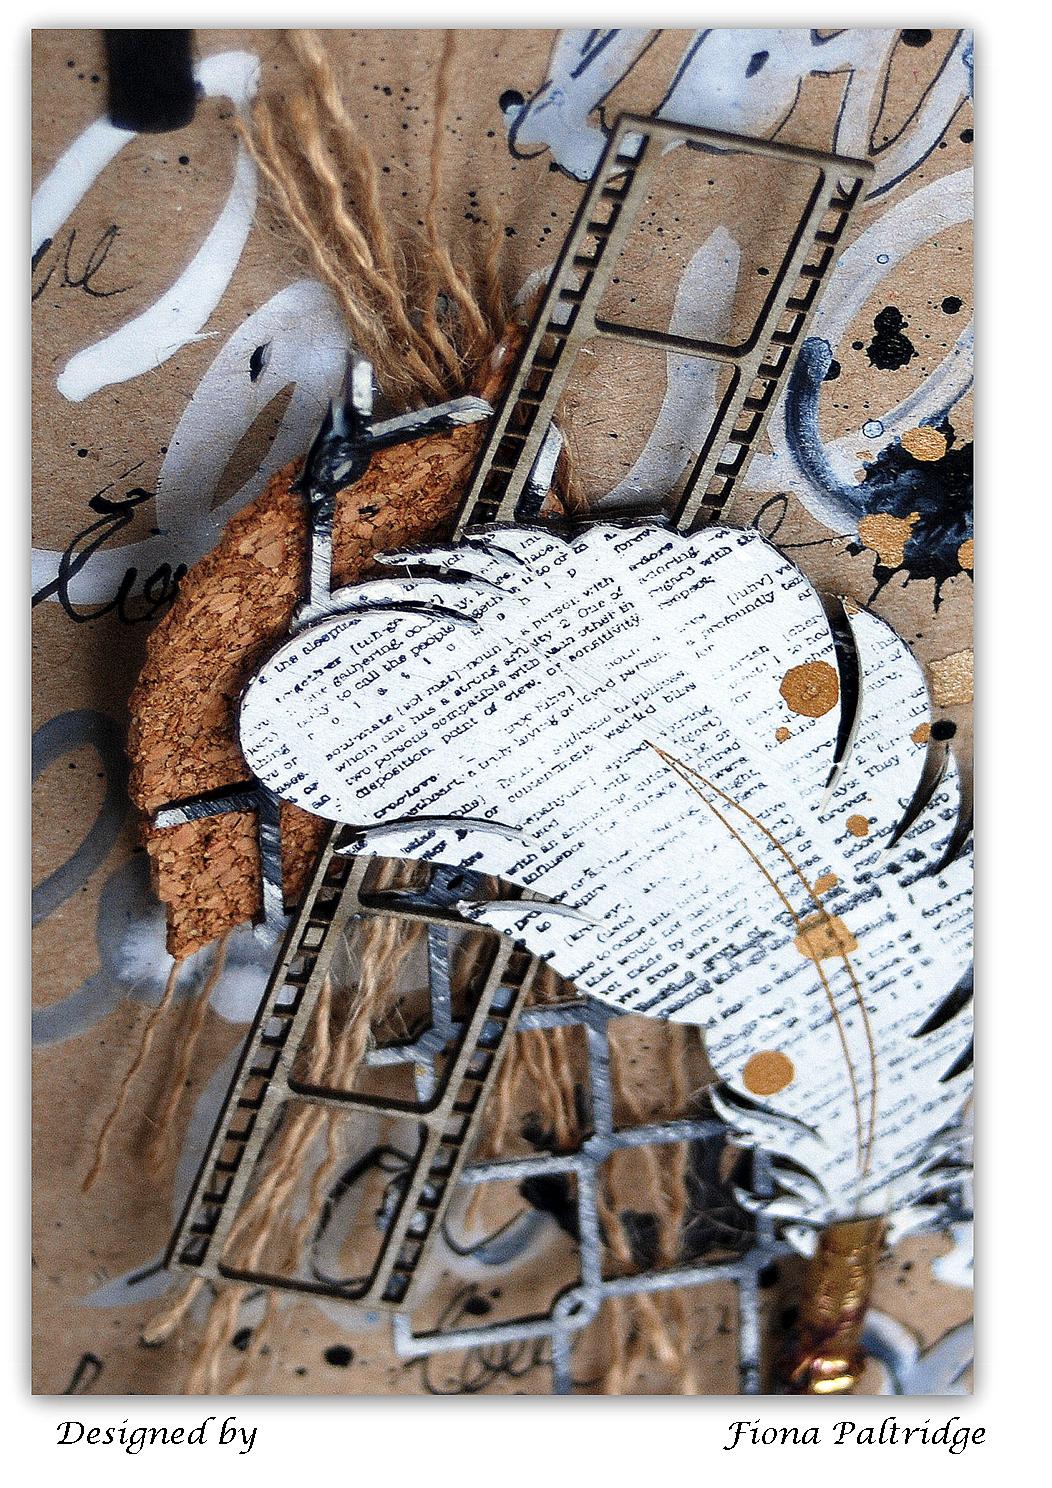
This little frame piece is created using a piece of Kraft paper. I began by writing the word love all over it in black and white ink.

 I stacked my pieces up on to the Kraft paper bit by bit. The "Fencing Wire" is painted white and then brushed over lightly with a small amount of black to give it a galvanized affect.


 The "Tiny Film Strip" I have left raw to compliment the Kraft colour.

 The sentiment is made up of a collection of chipboard letters and words combined with the writing of "love" in the background.

The piece id finished off with the focus piece, a "soft feather" from my favourite feather set. I simply painted it white and then stamped some script over it. I also added an actual nib to make it a quill.
I love the depth of this frame. I picked it up from K-Mart or somewhere like that for only about $4. It makes a really nice little piece once filled with gorgeous chippy.


My next creation is a layout I designed in purples, pinks and teal.

"Just The Girls"


2Crafty Chipboard used:
"Number Panels"
"6" Revolution Circles"
"Just The Girls"

 I have to say purple, pink and teal are not colours I normally reach for but I wanted to give it a go. I began by creating a pinky purple background and then covered the "Number Panel" with white tissue paper and then stamped over it with black script stamp. Later I added some more teal over the top.

 I used two of the circles from the "6" revolution circle" packs. I simply painted them teal but later I added some white over the top to soften them slightly.

 I used each one to frame the area where my photos would go.

 I separated the title "Just the Girls" so I could place half in one circle and the other half in the other, spreading out the balance of the layout. Again I painted them teal but so that they would stand out, I didn't soften them with any white.


Thank you for popping in to see my creations. 

Photobucket

13@rts Layout

Hello! I'm here today to share my 13@rts layout I have made using the new collection "Out of the Blue" with you
I just love the gorgeous sprays of flowers Olga has designed on these papers. I couldn't wait to create a pretty page using them.


13@rts Products Used Include:

"Out of the Blue Collection"

Ayeeda Mists:

Mediums:

Other products include:


7 Dots Layout Using "Fortune-teller"

Hello everyone. how exciting are these new collections from 7 Dots Studio? I'm in love with both of them but today I bring you a layout I have created using the "Fortune Teller" collection.


I just adore the collection of ephemera pictures from the 12x12 Soul paper. I wanted to showcase some of these in my layout.


So I fussy cut them out along with a collection of stickers and die cut elements to make up the embellishments for this piece.


I also couldn't wait to try out the new coordinating stamp set. I used the little circles on the background and the feather as a feature under my photo.


I finished it off by adding a title from the coordinating chipboard collection.


I love the browns and creams in the collection and how they come together to make a fabulous neutral piece. I'm so excited to add the teals to it next time!

I hope you've enjoyed reading how my little creation came together. I'll see you all again next time.


7 Dots Studio products used:


She has Blossomed

Hello I'm back with you again to share my second creation from the Scrappy Chat Designs "Vintage Garden" kit. This time I did go a bit vintage. I really couldn't help myself .... it was all the blossoms that did it!! The Ruby Rock-it papers are just so beautiful. I couldn't resist. So I channeled my inner vintage and created this!


 This layout has incorporated in it, an incredible amount of depth. My tech sheet demonstrates how I achieved this along with a printable stencil for you to use to create the leaves in the background.


Are you a member?


Our members receive videos, tips and tech sheets similar to this little technique every month.


If you want more of this then ...........


Here is how you can join!

Joining Scrappy Chat Designs is like doing 3 classes each month - all in the comfort of your own home!

Each premier kit comes with:
Video AND instructions to complete the three layouts and feature many techniques with product to be used well after the life of the kit. (With all of our kits you will have plenty of product and knowledge to add to future projects)
Photos of each project including close up detail pictures.
All the product needed to complete the project with a list of additional basic items used such as ink/ paints/gesso/texture paste and colour sprays you will need out of your supplies.
The kits focus on how to use various products teamed up with some pretty paper to compliment them, so there is always less or non-consumable products in our kits, to not only help you complete some beautiful projects, learn many techniques and ways of using the different product as well as taking them well beyond the kit projects.

Kits are $45 + postage and come out monthly. Please e-mail us at orders.scrappychatdesigns@gmail.com if you would like to order this kit

For more kits and other products visit our website www.scrappychatdesigns.com.au
Scrappy Chat Designs Kit club Membership (e-mail us to purchase):

This lasts for 3 months is $149 and includes 3 kits at OVER 10% off!!! and postage for all 3 kits  INCLUDED (they are released monthly).  As a member you also get ‘insider’ info on what is coming up in the next kit – sometimes even a pic! You get additional 'Technique sheets' showing you more techniques you can nail with the product in the kit from the talented Arty Chic's.  You are also guaranteed the kits which do sometimes sell out VERY quickly.  If you are interested in membership, you need to pay the membership fee by the 30th of the month prior.  So to commence in February (next kit to be released) you need to have your membership fee paid by 30th January. Just email for this deal orders.scrappychatdesigns@gmail.com 

Just email for this deal orders.scrappychatdesigns@gmail.com 


13Arts May Challenge - Everything About Spring

I love the beginning of each month in the scrapping world because it brings the opportunity for challenges! And this months challenge over at 13Arts is a beautiful one!

The theme is "Everything About Spring" and it gave me an opportunity to make this using the new "Aura Rosa" collection.

Here is the inspirational promo. It is created using the "Out Of the Blue" collection which is also springing with spring challenge potential.


So this was the beginning stage ..... a swamp monster! I had added water onto my watercolor paper and then I literally tipped the bottle of Celedon Ayeeda Chalk spray into a small zip lock bag (not really all of it) and mixed some water with it along with some Ayeeda Shiny Powder in the Shimmer Green. I was intending to funnel it back into a bottle (I was trying to make a shiny spray) but something came over me and so instead, I snipped a corner of the bag with my scissors and dribbled (more like poured) the mixture on to my background! 


What had I DONE!!! While it was still wet .... so like an hour later LOL!, I sprinkled some Rainbow color Turquoise duo over the top and sprayed it (very lightly - holding my water bottle about 3 feet away to get a very fine mist!). I wasn't happy with it AT ALL! So I posted my disaster on Facebook - as you do- and went to sleep it off!

The next morning it was dry, and shiny, and beautiful and it was perfectly matched to the "Auro Rosa" collection so i went to work adding some stencilling, some Antiquie Cream splats, more Ayeeda Shiny Powder in the Green and lots of gorgeous flowers that I fussy cut out of the papers both 6x6 and 12x12, I even cut the butterflies from the back cover of the 6x6 pad!


It came together perfectly! The triple photo idea came about because I wasn't sure what sized photo I would go with, so I printed the same photo in three different sizes. After they had come out of the printer it suddenly hit me that I could use all three cut out! And so I did!


Lastly I added my title from the 12x12 chipboard word set. I tried several different words but "Beautiful" just kept coming back so that is what I went with in the end.


13@rts products I used included:

"Aura Rosa" Collection
Spring Flowers 12x12 paper
6x6 Paper Pad - I even used the back cover

Mediums


Dive In - A Card for VLVStamps

Hello I'm here with you today to share a little card I made for Viva Las Vegastamps.


"Dive Into the Great Unknown" is a card of encouragement. Sometimes we need a little bit of encouragement to try something new. I began this card by stamping the dictionary page on to some crumpled tissue paper to create some of my background.


I just love this Whimsical little divers mask. I gave it just a little touch of colour to match the background papers I used.

I finished the card off by adding the title. Personally I love the great unknown. I find there's no better way to know whether you can do something or not than to dive in and have a go!

Viva Las Vegastamps used:


Catch you next time xxx