2 Crafty Chipboard Share Number 2 for February

Hello again my lovelies! Today, as promised I'm sharing my second OTP project this month for 2 Crafty Chipboard.
This time it's a little canvas (6x6) that I have created.

"Dream"


2 Crafty Chipboard products used:
"Loopy Font Word - Dream"
"6in Revolution Frames"
"Addy's Butterflies"
"Frame Ingrid's"
"Handdrawn feathers"

I've layered and layered all the chipboard along with cheese cloth, paper flowers and some cardboard for height.
The background is a combination of modelling paste applied liberally then dried, a layer of 13Arts sprays in blue and turquoise and then a sprinkling of Beck BT's Tinby Designs Color Crush powder in the deep blue. I finished it all off with a spray of water and left it to dry over night.

The next day I went to work decorating the little chippies I had chosen. Some are heat embossed, others are just painted using different effects such as sponging or stippling.


I am really happy how this turned out. I am definitely going to be making some more.


That's me and my creations for another month. I can't wait to show you what I am creating for March xx


2Crafty Chipboard Share for February Number 1

Hello all! I'm here with you today to share the first of my projects for February for 2 Crafty Chipboard. This one is an of off the page project that I call "Frame Art"

"Live Laugh Love"


2 Crafty chipboard products used:
"Live, Laugh, Love Title"
"Lattice Leaves"
"Skeleton trees"

I layered some cardboard, book pages, hessian, cheese cloth and lattice weave to create this 3D frame art. It is all balanced very carefully using LOTS of glossy accents!


Working backwards from the top down, I used the title "Live Laugh Love" painted black and then highlighted with some white drawing ink.


Next layer down is this gorgeous "Skeleton Tree". They come in a pack of two. I simply coloured it using some 13Arts sprays after a base coat of gesso.

Final layer I added some of the "Lattice Leaves" that I gave a gesso coat to and painted with brown water colour paint.

I'll pop in tomorrow with my second OTP project for 2Crafty Chipboard this month. xx


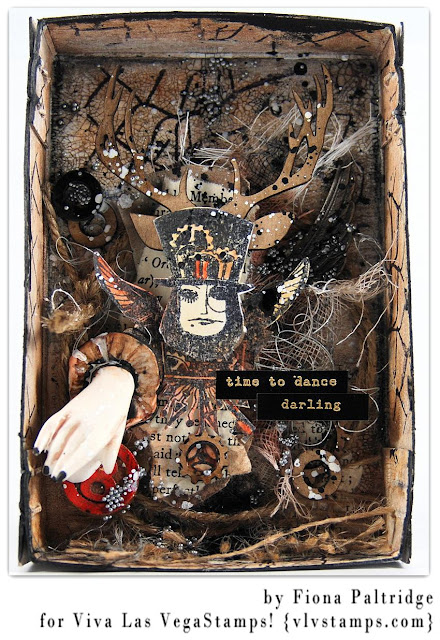
Viva Las Vegastamps "Time To Dance Darling"

Hello! Today I'm here with you to share a new project I created using the awesome rubber stamps from Viva Las Vegastamps!

"Time to Dance Darling"


This was one of my first VLVS purchases as soon as I knew I'd made the team and I was given the instruction to choose my favorite stemps, I went for this gorgeous "Steampnk Woman's Head".


I had a definite idea in mind of what I wanted to create. All I needed was a little cardboard box and some trinkets to adorn her!


I gave the box (which is actually a lid to a box) a light coating of gesso and then added some crackle medium. Once that was dry I added water colours and then some stamping with the Jagged Chain Link Fence background stamp.


Then all it took was ......... some depth (lots of layers of cardboard!), some old book pages, some Um WOW Studio chipboard and a Relics and Artifacts resin hand and she was ready to go to the ball!!!


I'm so pleased how it all turned out. I was getting worried towards the end but once I added the micro beads and some black and white ink flecks, it suddenly all came together.

Stamps I used to create this piece include:


I hope you like my crazy piece. I had a blast creating it.

Catch you next time.
Cheers
Fi

My Little Book of Dreams

Hello! Here I am again! This time I'm sharing a little note book I have adorned using the beautiful 7 Dots Studio Verano Azul collection.


Every time I work with this beautiful collection I create something so pretty. It really lends itself to girly, flowery creations.


I used the stencil "Flurries" with some modelling paste as my first layer, then added some paint flicks over the "Dazzle Me" paper that I had used to cover the back and front of the little note book.


Then I adorned it with layers of tags and elements both from the die-cuts and the stickers available in the range, along with some matching flowers. Then I edged it with some gesso to soften it.


The back I kept simple as I wanted to still be able to see the paper and the stenciling on it.


All I added to the back was a little sticker that says "Dreams are for chasing" This can be my little book of dreams, where I'll jot down all the things I want to pursue in life whether they be big or small.

Thank you for popping in and checking out my little creation today. I will see you again soon.

7 Dots Studio Products Used include:


13Arts Design Team - A Dream Come True

Every now and then something wonderful happens for me and I have to ask myself "What have I done to deserve such a fabulous opportunity?". I have had many wonderful opportunities during these last couple of years but making the team over at 13Arts definitely is up there with one of THE BEST feelings ever!!!

I am so honored and humbled to be asked to be a part of this amazingling talented team!

Designers from all over the world who I have followed and admired for such a long time.
People who I class as an inspiration, someone to aspire to and then there's little Ol' me. Oh My what have I done? Bahahahahaha

No in all honesty I hope I can do this gig proud. I truly love Aida's products and I am (as you all know) a HUGE mixed media fan so I am excited to be taking on this new venture.

I have had a little stint with 13@rts last year when I was honored to be a guest designer for 3 months. I knew then that this was what I wanted to do permanently. The team were so professional to work with as well as so supportive and kind in every way.

Here are a couple of those projects from way back when .....


I will be teaching with 13@rts products at the Melbourne PaperArts Expo in April.

Come along and try them out. Stay tuned and I will let everyone know as soon as the class bookings open!

I can't wait to share some more projects with you all. Phew ..... I am going to be FLAT OUT!!!

Viva Las Vegastamps February Challenge

Hello! It's challenge time over ay Viva Las Vegastamps!!! I've put together a little journal page using this months challenge as my inspiration.

"Live Like There Is No Midnight"


I drew most of my inspiration from the whimsical appearance of the challenge frame and took the words bold, characters and circles. 


I also incorporated the colour purple by adding some watercolor to the old book page wing I created.

This is a depiction of the story Cinderella, one of my favourite fairy tales. I even drew some little white mice! I incorporated the stamp quote "Her wings were made of bold patterns and bright colors" to represent Cinderella's courage.


I created a little pumpkin half way up my page and decorated it with two different style circle stamps.


I chose bold colours in the lime and orange for my background. I love the impact and contrast the black stamping has against it. For good measure, and because it happens to be my most favourite stamp at the moment, I added some stitching stamping!

Here is a list of the stamps I used.

Design Open Circles 1 3/4 X 1 3/4
Stitching 3/4 x 2 1/2
Her wings were made 3/4 x 4
Writing Circles Background 1 3/4 x 4 1/2

Join me in the challenge. You can find all the information HERE
I can't wait to see what everyone creates!! Have fun xx